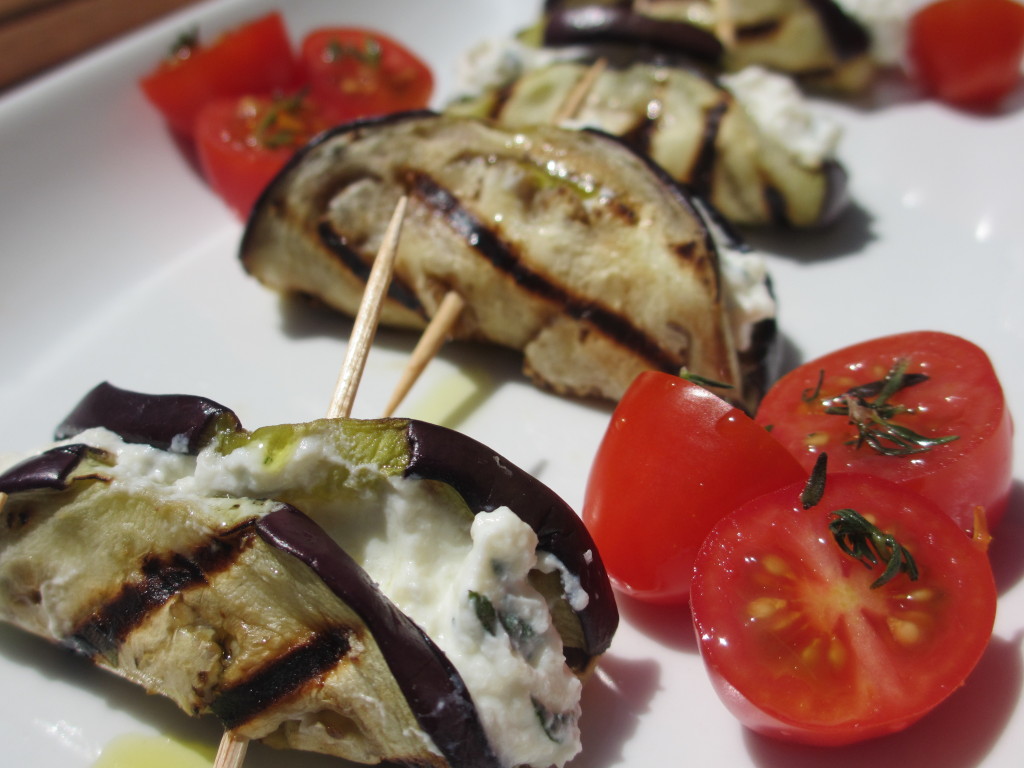
Grilled aubergine wrap with ricotta and thyme

rotolo di Melanzane e Ricotta

Difficulty:Very easy Time:Quick

INGREDIENTS (x 6 persons):

  • - 2 long purple aubergines
  • - 100 g of Italian ricotta cheese
  • - 100 ml already-made tomato sauce
  • - extra virgin olive oil
  • - salt/pepper
  • - 1 large handful of grated Parmesan
  • - 1 handful of fresh thyme
  • - toothpicks
  • - some cherry tomatoes to decorate (optional)

WHAT TO DO:

  • 1. Remove and discard some stripes off the aubergine skin. Cut the aubergines in about 1/2 cm slices and grill them in a hot non-sticky grill pan.
  • 2. Lay the grilled aubergine on a baking tray covered with paper foil. Place on each slice half a teaspoon of tomato sauce, some ricotta cheese, a teaspoon of Parmesan, a pinch of salt and pepper, and 1-2 leaves of basil.
  • 3. Then, make a wrap of the aubergine slice and fix it with a toothpick. Drizzle with some oil and serve them in a dish you have decorated with some cherry tomatoes and thyme.

TIPS & TRICKS:

  • - This is a nice, handy recipe to finish some leftover ingredients from previous dinners, such as the tomato sauce (check out the correspondent recipe). Alternatively, you can purchase an Italian already-made sauce which you should be able to find in your area.
  • - To grill the aubergine, you can also use a deep pan, which you pre-grease with just few drops of olive oil.
  • - If you do not like ricotta cheese, you can alternatively use a hard type of mozzarella, such as the cube size for pizza.
  • - If you want them warm, cook the au gratin in a pre-heated oven for few minutes. In this case, you can get a nice crust on top of your wraps by adding a drizzle of grated Parmesan before putting it into the oven.

Read More

Goat’s cheese, roasted grapes & walnut bruschetta

bruschetta con Uva

Difficulty:Very easy  Time:Long

INGREDIENTS: (x 2 bruschette)

  • - 10 seedless grapes – any type
  • - 1 small handful of picked thyme leaves
  • - 1/2 clove of garlic
  • - extra virgin olive oil
  • - salt/ground pepper
  • - 10 walnuts, crushed into pieces
  • - 2 thick slices of sourdough bread
  • - 50 g of soft goat’s cheese
  • - Acacia honey

WHAT TO DO:

  • 1. Spread the grapes, cut into halves (alternatively as a whole) on a baking tray with a little bit of olive oil, salt and pepper, and almost all the thyme.
  • 2. Place the tray into a pre-heated oven (180°C) for about 15-20 min until the grapes start to colour brown. When done, remove the tray from the oven and set it aside.
  • 3. While the grapes are in the oven, toast the slices of bread and gently rub one side with a peeled side of a garlic clove.
  • 4. Spread the goat’s cheese on the same side as the garlic, add the roasted grapes as well as the crushed pieces of walnut. Drizzle the bruschetta with some olive oil and the remaining thyme.
  • 5. As a last step, add a few drops of honey and serve it warm.

TIPS & TRICKS:

  • - This recipe is a light modification of its equivalent in “Polpo -a Venetian cookbook (of sorts)”. My interpretation is a simpler version.
  • - You can either cook the grapes as a whole or cut them in halves. In this case they get softer.

Read More

Spaghetti alle Vongole – mamma’s way

PrimiOct 07 20131 Comment

pasta alle Vongole

Difficulty:Difficult  Time:Long

INGREDIENTS (x4 persons):

  • - 1 kg clams/vongole
  • - 300 gr spaghetti ( or linguine)
  • - extra virgin olive oil
  • - sea salt
  • - 2-3 garlic cloves
  • - 2 glasses of still white wine
  • - salt/black ground pepper
  • - a pinch of chili pepper (peperoncino) powder or dried chili flakes (optional)
  • - 1 large handful of flat parsley leaves, finely chopped

WHAT TO DO:

  • 1. Put a deep pan of water on a fire, cover with a lid and let it get up to boil. When boiling, bring down to a gentle boil and add a handful of sea salt. Let it get back to boiling before adding the spaghetti.
  • 2. In the meanwhile, add a slug of olive oil on a frying pan with the garlic cloves. Sweat the cloves, then throw the clams in the hot oil.
  • pastaVongole1*
  • 3. Stir the clams until they start to open and add the wine. Let the wine dry out applying a high flame. It should take only few minutes to open the clams up. It is ok to serve the occasional closed clam, but do remember to not open and eat them. Cover the pan with a lid to keep everything warm.
  • 4. While cooking the clams, you have put the pasta into the boiling water and let it cook until ‘al dente’. ‘Al dente’ depends on the time, which is put on the packaging of the pasta. When the pasta is ready, drain it, but keep a small amount of the pasta’s cooking water.
  • 5. Throw the pasta into the saucepan with the clams, stir it. Then add the parsley, some olive oil, the freshly grounded black pepper, a pinch of chili pepper (optional) and a sip of the cooking water (to adjust it until enough creamy). Serve it hot. I love this dish!!

TIPS & TRICKS:

  • - If the clams are freshly collected, like the day before your meal, place them in a large plastic colander inside a basket with cold salty water. Change the water few times while letting the clams drain. This should make the clams release the sand inside which will benefit the dish a lot. The day after, rinse the clams vigorously under cold running water while scrubbing the shells on the outside – if necessary.
  • - While cooking the clams, you can keep the garlic cloves as a whole and discard them later or you can thinly chopped them. This latter option allows you to have them mixed up in the sauce.
  • - Prepare some slices of fresh bread, perhaps lightly toasted. The bread will allow you to take up some of the left-over sauce, which is very nice!

Read More

‘Arrosto’ with onions and rosemary

arrosto cipolle

Difficulty:Difficult Time:Very long

INGREDIENTS (x 6 persons):

  • - 600 grams of pork tenderloin
  • - 1.5 to 2 white onions (midsize)
  • - extra virgin olive oil
  • - 1 garlic clove
  • - a rosemary bunch
  • - 1/2 glass still white wine
  • - salt/pepper

WHAT TO DO:

  • 1. Chop the onions coarsely.
  • 2. Put the onions, garlic, olive oil, rosemary, salt and the meat altogether in a roast pan – keep in mind that you do not have to sautee the onions first!
  • 3. Let it cook at high flame on the stove for a few minutes.  Avoid burning the onions but, at a same time, sear the roast.
  • 4. Add the white wine, lower the fire temperature, and let it cook for about 20 minutes.
  • 5. The meat cooks generally faster than onions, so take the meat out of the stove before the onions get burnt out. I suggest you to try and poke the meat roll with a fork beforehand. Then wrap it in an aluminum foil to keep it warm.
  • 6. In the meanwhile, let the onions dry a little longer and smash them in a cream to get the sauce to accompany the meat.
  • 7. Cut the meat in thin slices and serve it warm with the creamy sauce on top. Enjoy it!

TIPS & TRICKS:

  • - The original Marcella’s recipe was meant to be prepared with veal or pork. We decided to make it with pork tenderloin, in a long roll shape, and it came out great!
  • - This dish goes well with panfried potatoes which you can easily make yourself at home or buy already-made (which I would not suggest unless you are in a hurry!).

Read More

Panfried potatoes/Patate “in tecia”

papate in padella

Difficulty:Very easy  Time:Quick

INGREDIENTS (x 6 persons):

  • - 8 big white potatoes
  • - a bunch of fresh rosemary
  • - extra-virgin olive oil
  • - salt/black pepper
  • - roast herbs seasoning (optional)
  • - 2 garlic cloves, with the skin

WHAT TO DO:

  • 1. Before starting, wash the potatoes and cut them into big chunks. Keep them into a bowl filled with water until the moment you cook them.
  • 2. In the meanwhile, press the garlic cloves (including their skins) by using a knife and stew them up quickly into a non-sticky frying pan.
  • 3. Take the potatoes out of the water, transfer them into the pan and season them according to your taste with rosemary, salt, and –if available- the roast herbs (optional). Cook them at high heat until nicely roasted, turning them from time to time to let them roast on different sides.
  • 4. When they are well cooked, cover the pan with a lid and let them stay there to soften for at least 10-15 minutes. Serve them warm.

TIPS & TRICKS:

  • - This recipe is a quick version of the ‘Roasted Potatoes’, traditionally prepared in the oven.
  • - Do not be scared to undercook your potatoes when you notice they get well done on all sides. Covering them with a lid and letting them stay still will give them the required time to soften up.
  • - Try not to exceed with the roast herb seasoning as they could be already salted and then alter the taste of the dish. If available in your area, there is a nice, ready-to-use Italian mix called ‘Ariosto’ which works really well. Nonetheless, the dish comes out well without any herbs anyway.

Read More

Courgette flowers in the oven with ricotta and anchovies

fiori di zucca al forno con ricotta

Difficulty:Very easy  Time: Quick

INGREDIENTS (x 5 persons):

  • - 10 big courgettes flowers
  • - 200 g ricotta cheese
  • - 3 tablespoons of grated Parmesan
  • - 3 tablespoons of plain breadcrumbs
  • - extra-virgin olive oil
  • - black pepper
  • - 3 anchovies, in oil

WHAT TO DO:

  • 1. Before you start, warm up the oven at 160°C.
  • 2. Wash the courgette flowers under running water, making sure not to break them – they are fragile! Discard the central pistil of each flower and place it to drain in a colander.
  • 3. In the meanwhile, mix the ricotta cheese with the Parmesan in a deep bowl and add some black pepper. Cut the anchovies in small pieces.
  • 4. Take one flower at a time and fill it with a little piece of anchovy and 2-3 teaspoons of ricotta mix.
  • 5. Then close the stuffed flower with you hands by putting together the flower petals tips. Place the flowers on an oiled baking tray.
  • 6. When finished with all the flowers, spread on top of them some breadcrumbs with a sprinkle of parmesan and a drizzle of olive oil.
  • fiorizuccForno3*
  • 7. Cook the flowers in the oven for about 10 minutes. Switch the oven to ‘grill’ and make them take some colour, which takes a few extra minutes. Eat them warm.

TIPS&TRICKS:

  • This recipe is a lighter version of a traditional Roman starter. The dish is  done by using mozzarella cheese instead of ricotta. It also uses ‘pastella’ (a kind of flour-basted mix) to fry. Different but delicious anyway!

Read More

Light breaded crispy chicken and thyme

cotolettaLight

Difficulty:Very easy  Time:Quick

INGREDIENTS:(x 2 persons)

  • - 2 free-range chicken breasts
  • - 100 g plain breadcrumbs
  • - 1 handful of oregano or thyme
  • - salt
  • - extra-virgin olive oil

WHAT TO DO:

  • 1. Slice the chicken breasts into small fillets or slices.
  • 2. Place the breadcrumbs with the oregano on a plate or in a box. Put the chicken into the mix and make sure all sides of the chicken are covered with the breadcrumbs. Then keep the chicken aside.
  • 3. In the meanwhile pre-heat a non-sticky griddle pan. When the pan is hot, reduce the heat and cook the chicken until the colour is gold and it looks crispy.
  • 4. Adjust with salt and a drizzle of olive oil just before serving. Super easy and yummy!

TIPS & TRICKS:

  • - This recipe could be a good tip for a light, quick lunch.
  • - I suggest adding the salt only at the end to avoid the meat to get to stiff while cooking.
  • - A nice alternative is with turkey fillets.
  • - If you like a slightly stronger flavour, spread a hint of mustard on the chicken before rolling them into the breadcrumbs.
  • - It is nicely served with a fresh mixed salad and tomatoes, simply dressed with extra-virgin olive oil, balsamic vinegar and salt, and eventually some mixed seed on top.
  • insalMix1‘Buon appetito’!

Read More

‘Orecchiette’ pasta with broccoli, anchovies and ‘pan tostato’

PrimiSep 20 20130 Comments

orecchiette con Broccoli

Difficulty:Difficult  Time:Very long

INGREDIENTS: (x4 persons)

  • - 300 g of orecchiette pasta
  • - 200 g tender stem broccoli
  • - 5 anchovies fillets
  • - 2 garlic cloves
  • - salt/sea salt/black pepper
  • - extra virgin olive oil
  • - 1 large handful of grated parmesan
  • - 3 tablespoons of small capers

For ‘pan tostato’:

  • - 150 g of plain breadcrumbs
  • - 1 tablespoon extra virgin olive oil
  • - freshly-ground black pepper
  • - 1 tablespoon of grated parmesan

 WHAT TO DO:

  • 1. Wash the broccoli and break it in smaller pieces. Trim and finely chop the stems, making sure you discard any hard portion.
  • 2. Take a deep saucepan and toss the broccoli and their chopped stems with a pinch of sea salt and cook them until tender but still a little crunchy. By the way, you can use the same pan later to cook the pasta.
  • 3. When ready, switch off the fire and take the broccoli out of the water. Cover the saucepan with the lid to keep the water warm. Keep the veggies in a separate bowl.
  • 4. In the meanwhile, stew the garlic cloves in a generous amount of olive oil. When golden, take the pan out from the fire and gently melt the anchovies into the hot oil, pressing them with a wooden spoon.
  • 5. Add the broccoli and put back the pan onto the fire. Let it cook for 10-15 minutes until the broccoli get enough flavour from the anchovy base.
  • 6. Put the water back to boiling and when ready toss the orecchiette. Gently stir from time to time to avoid sticking and check the cooking time for ‘al dente’ result.
  • 7. In the meanwhile, take a non-sticky frying pan and mix all the ingredients for pan tostato. Put the pan on the fire and, while continuously mixing, panfry this mixture until golden and crispy (watch out as it takes few minutes to get ready!). Take it out from the heat as soon as it is ready in order to avoid burning.
  • 8. When the orecchiette are ready, discard the water and mix the pasta with the broccoli base.
  • 9. Before serving, add on each portion about two tablespoons of pan tostato, a teaspoon of capers, a sprinkle of parmesan, ground pepper and a drizzle of olive oil to finish. Fantastic!

TIPS & TRICKS:

  • - This is one of my favourite dishes and it comes directly from Puglia, my mum’s region, as a typical dish from Bari. You will love it!
  • - Please remember to cook the pasta in the same water you have used for the broccoli. This detail gives a special flavour to your dish!
  • - The anchovies are nice when combined with the broccoli, in small quantities, but can be avoided if you do not particularly fancy them. Same story for the capers.
  • - If you cannot find the tender stem broccoli, a nice alternative is with regular broccoli. In this case you need to trim, peel and cut them with extra attention to discard the hard portions.

Read More

Crostata with cream, strawberries and raspberries

DolciSep 17 20130 Comments

torta sis1

Difficulty:Difficult  Time:Long

INGREDIENTS (x 6 persons)

For the cream (check recipe ‘crema pasticcera)

For the dough

  • - 250 g non-raising plain flour (‘00’)
  • - 100 g unsalted butter, diced
  • - 100 g caster sugar
  • - 2 eggs (1 whole egg and 1 egg yolk)
  • - 1/2 organic lemon zest
  • - salt

To decorate

  • - 250 g raspberries and strawberries
  • - 2 tablespoons of confectioner’s  (superfine) sugar

WHAT TO DO:

  • 1. In a large bowl mix 250g flour with a pinch of salt, 100 g of sugar, the grated zest of 1/2 lemon, and the cold- diced butter. Mix until the dough turns into crumbles.
  • 2. Add 1 whole egg and 1 egg yolk, mix quickly until smooth.
  • 3. Wrap the dough with a transparent food wrap cling film and let it rest in the fridge for 30 minutes.
  • 4. In the meantime prepare the crema pasticcera and let it cool down in a separate deep pan.
  • 5. Pre-heat the oven at 200° C.
  • 6. Roll the dough on a 22 cm baking pan, make tiny holes with a fork, cover it with parchment paper and, on top of it, put the dry beans. (The objective is to let it cook without drying. I used rice in absence of any beans).torta sis 2
  • 7. Let it bake for 20 minutes, take away the beans and the parchment paper and continue baking for 5 more minutes.
  • 8. Let the crust cool down.
  • 9. Transfer the crust on a serving plate. Cover with the crema pasticcera, decorate with the fruits, and sprinkle on top a generous amount of confectioner’s sugar. Enjoy!

TIPS & TRICKS:

  • - This recipe comes out very nicely with any kind of fruit. The more you put on top, the better! (Thanks Manu for helping me out!)
  • - A richer version of the basic crema pasticcera is crema Chantilly, which you can purchase in some local shops or get to it by adding some whipped cream to your crema pasticcera.

Read More

‘Crema pasticcera’/Pastry cream

Difficulty: Very easy Time:Quick

INGREDIENTS (x 6 persons)

  • - 6 free range yolks eggs
  • - 6 tablespoons plain flour ‘00’
  • - 6 tablespoons caster sugar
  • - 1 L whole milk
  • - 1 organic lemon zests

WHAT TO DO:

  • 1. Thoroughly whisk the yolk eggs with the sugar in a bowl until creamy and light.
  • 2. Add the flour gently and stir little by little thereby avoiding any formation of clumps.
  • 3. Pour the milk in the bowl, mix it well with the creamy base and grate the lemon skin into zests (only the yellow part please).
  • 4. Cook it at low heat until it starts boiling, but make sure to continue stirring with a wooden spoon to avoid clotting.
  • 5. Let it boil for few minutes. When it starts condensing, take it of the fire and let it cool down. You now have a really nice base of ‘crema pasticcera’.

 TIPS & TRICKS:

  • - This is an excellent base for the Italian traditional ‘crostata’ with fruits.
  • - Alternatively, eat it without a pastry base with just fruits or just crumbled biscuits such as Italian ‘Amaretti’.

Read More
Top of Page